>

Thursday, December 7, 2023

CHRISTMAS ORNAMENT

It's time for December TicTacToe Challenge #238 designed by Felicita.  I have been stitching a few ornament cards for special people on my card list and this one worked perfectly for this week's challenge.


I find stitching these ornaments so much fun - and so easy to do while watching a favorite TV show.  I finished off the back also.


I used gold metallic thread as a hanger for the ornament and it is just scotch taped to the back of the embossed panel.  That way the card panel is removable and the ornament can be put on the tree.  Just a simple little sentiment finished off the card.


I went from left to right diagonally - free, ornament and red or green.  I think have just about all the board elements in my card except patterned paper.

Hope to see you in our challenge this week - crafty hugs,


Sunday, December 3, 2023

PINK POINSETTIA

 Another Christmas card for the stash!

supplies: sentiment: flower; arches; mica spray
I first took a sheet of pink cs and sprayed with TH mica spray.  Then spattered with gold metallic watercolor.  Did the same for the green.  Die cut petals and leaves and assembled the flower.  Used arch dies to make the card base.  Put it all together with white berries and a little sentiment.

Thanks for stopping by.


Saturday, December 2, 2023

CHRISTMAS VILLAGE

The other night Gina K. did a video on making a little village scene Christmas card.  I didn't have any of the dies she used, but was still able to make a similar card with other dies.


I shopped my stash and used a little village die, some trees, snow banks, a sentiment and a frame - all from different companies.  After the village was glued to the vellum, I colored in all the windows (on the back of the vellum) with yellow copic marker.  It took a little fiddling around but I think it came together pretty well.  

Thanks for dropping by.


Thursday, November 23, 2023

HAPPY THANKSGIVING

Happy Thanksgiving and what a great day to be designing a thank you card for TicTacToe Challenge #236 - board created by Elizabeth.  I went down the center with die cut, free and thankful.

supplies: embossing folder; cardstock 

I made a mini slimline card (3.25"x6.25").  Embossed the center panel with some fall leaves and then added various die cut leaves.  I had fun with making some pretty papers with TH mica sprays and used that for my leaves.  Before assembling my card, I spattered metallic gold and finally added some Nuvo copper drops.


Thanks for stopping by - Happy Thanksgiving - crafty hugs,


Monday, November 20, 2023

FROM THE SCRAPBOX

I went thru my scrapbox yesterday and made this card from a piece I had stamped years ago - I don't think I even have the stamps any longer.  Too bad as I rather like the end result!

It was A2 size so cut it down and added a gold border.  Added the gold embossed sentiment, some gold sparkle bits, put it on a Desert Storm card base and done!!


Thursday, November 9, 2023

BLUE POINSETTIA

We're counting down to Christmas with Joanne's challenge #234 this week.  I went down the right side with cream, sentiment and navy - what a fun color combo for Christmas!!

supplies: poinsettia; embossing folder; sentiment; patterned paper

My embossed background really is cream although it looks quite white in the photo - you'll just have to believe me!  After embossing the panel, I added it to the navy base.  Then added the blue poinsettia which I die cut from some patterned papers.  Lastly, the little sentiment was adhered and the whole card spattered with gold ink.

Hope you'll join us this week at TicTacToe #234 - you'll have a chance to become a future guest designer.


Thursday, October 26, 2023

GINGKO LEAVES

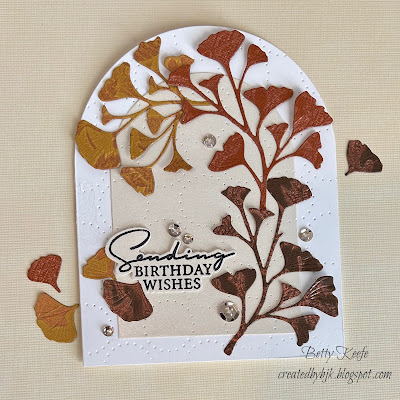
I'm the board designer for this week at TicTacToe Challenge #232.  The idea I had in mind was to include fall and thanksgiving.  For my design, I went with the bottom row across - shape die, rust and leaves.  Hadn't done anything with my gingko leaves die for a long time - so that was my beginning.


Had some embossed and colored with pigment ink pieces of cardstock on my desk - had been playing with the technique from Jennifer which she showed a few weeks ago.  I had chosen copper metallic pigment ink and some darker pieces of cardstock.  Wasn't over the moon with the color combo or the dark colors.  So they became the leaves for my card. You can see the copper on the leaves a bit.   Used the arch dies for my card shape with a cream color metallic cs which I embossed with a circle impression plate.  Added the little birthday greeting and sequins and done!
 
Here's a closeup of the leaves embossed with copper.


Thanks for stopping by - join our challenge this week - the winner will be a future guest designer!  Crafty Hugs! 


Tuesday, October 24, 2023

CHRISTMAS POP-UP CARDS

I have had some Graphic45 papers for ages and among them are these large Christmas pictures.  Finally had an idea on how to use them.  These particular papers are no longer available but they have others in their current collections.


I made pop-up frame cards using Jennifer's instructions for the pop-up part.  I made my card an A2 portrait size card.  After folding the back of the card (the pop-up part), I glued in the Christmas scene.  Then I glued my french door front onto the back section.  

I made a little wreath for the door by die cutting a circle base using two dies together.  Die cut a bunch of green sprigs and glued them around the circle and added a few red "berries".  Added an appropriate sentiment and done.  Below is a closeup of the wreath.

The base of the card is white 110lb cardstock as is the front piece and stands up nicely.  A personal message can be written on the back of the card.

Thanks for visiting today.


Thursday, October 12, 2023

AUTUMN WREATH

Vicky created the board for this week's TicTacToe Challenge #230.  I went across the top with leaves, thank you and plaid.  

 supplies: wreath; plaid background: enamel dots

I embossed the front of the card with a plaid die.  Die cut my wreath from copper embossed cardstock which was in three different colors.  Added the thanks sentiment and the enamel dots and done.


Since I layered all my leaf die cuts to make my wreath, I'm entering my card at Die Cut Divas challenge for this month.

Lots of variety from which to choose this week, so hope you join in the fun for a chance to be a future guest designer.  Crafty hugs,


Thursday, September 28, 2023

HALLOWEEN CAT


Designed a cute Halloween cat for this week's TicTacToe Challenge #228 created by Felicita.  I went down the middle with moon, orange and cat.

I made a shaker card with glittery stars and other bits for my little cat all dressed up in her witch hat.  The cat and the window die cuts are from very old PTI sets.  The bats in the background are from a Kitchen Sink set which is no longer available either.  The night sky was done with blended DO inks - black soot, pumpkin and chipped sapphire.

Hope to see you in our challenge this week - winner will be a future guest designer!


Thursday, September 14, 2023

METALLIC LEAVES

Elizabeth has created a great board for us this week at TicTacToe Challenge #226.  I went across with metallic, free and gems.


supplies:  leaves; sentiment

I used Jennifer's embossing technique with copper metallic pigment ink on some light brown cs.  Then I die cut the leaves from that and arranged them on the light gray card base with a vellum overlay.  Added the birthday greeting, some gold sequins and done.

Hope to see your card in our challenge this week.  Crafty hugs, 


FALL WREATH AND BABY CARDS

I had an order for a couple of cards this week - each entirely different.  

supplies: olive leaves
 

The top card was for a fall birthday and the person wanted white, black, tan and orange in it.  Obviously, the second card is for a new baby girl.

I used the larger of the two olive leaves dies for the wreath.  I sprayed an orange piece of cardstock with carved pumpkin DO mica spray and cut out the leaves to shape them into a wreath.  I die cut black circles for the berries from a confetti die.  The background was given a little more texture with an impression die.  Put it all together with a little sentiment and done!

The baby carriage die cut was in my box of stuff - probably twenty years old!  I added all the flowers and the sentiment to a textured background and it was ready to go.

Thanks for stopping by today.


Friday, September 8, 2023

HALLOWEEN POP-UP

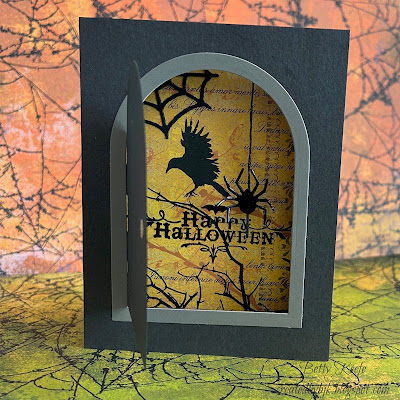
Had such fun making this Halloween pop-up inspired by JM - only I had to modify a bit since I had this idea also to make the front a door.  It all worked out quite easily tho.  I used the measurements from this video.  


supplies: arches;

I wanted the inside to be a surprise and so left the front very plain.  I first did the folding for the back piece per Jennifer's instructions.  Then made the front piece using some arch dies for the front door.  Made two hinges to hold the door in place.  Set that aside for the time being.

Used some very old patterned paper for the background, added a die cut cobweb in the upper corner and stamped and embossed the sentiment.  Added this to the center section of the background piece.  Finally added the front to the back.  Lastly the little spider was hung from the inside the front door for a fun surprise when the door is opened.  I added a white piece on the back of the card for writing a note.

Instead of placing something heavy on my card to hold the front to the back when glueing, I used three large binder clips - worked great!!

I am entering my card at the Two Old Bats Halloween Challenge - Anything Goes

Thanks for stopping by.


Thursday, August 31, 2023

VINTAGE BIRD

It's been ages and ages since I created a vintage card, but Joanne's TicTacToe #224 put me in the mood for digging out my vintage papers.  I had a very old, yellowed with age sales slip book (if you look closely it was printed in 1907!!) and that became the basis for my card.  I went across the center with numbers, yellow and free - and also went down the center with books, yellow and bird.

supplies: bird; leaves

Isn't that bird just the cutest ever?!  I die cut him/her out of white cs and then used colors left over on my blending brushes to color.  Used DO vintage photo on the edges of the card for a more aged look.  He's sitting on a die cut branch to which I added some leaves.  When I send the card I will put the person's name and birthday date up in the top blanks (most of my friends were born in the 1900's).  

Thanks for stopping by today and I hope you'll join in our TicTacToe Challange this week.  Crafty hugs, 


Wednesday, August 23, 2023

CAT ON THE FENCE

Halloween is on the agenda this week - another card for the Two Old Bats Challenge and also for Die Cut Divas (pop-up card).  Edit: also entered my card at Creative Creases Challenge.

I made a bridge card for my pop-up feature.  The fence is holding it together nicely.  Stamped some barren trees on the background which was sprayed with TH mica spray - sorry the shine doesn't show in the photo!  Added the other bits to complete a cute little Halloween scene.

Thanks for stopping by.


Tuesday, August 22, 2023

TRICK OR TREAT

Trying to enter more challenges lately - haven't entered The Two Old Bats Challenge since last year. 


I made a large piece of cardstock sprayed with some TH mica sprays - used that for my background.  Added the leafy border, sentiment, moon and bats to complete my design.  Decided it needed more sparkle, so sprayed it all with some glimmer spray.  
 
Thanks for stopping by.


Thursday, August 17, 2023

TIME TO CELEBRATE!!

Time for another TicTacToe Challenge!  I designed the board for the week and hope you will find it a fun one to do!  I went straight down the middle with patterned paper, free and birthday.  Also have other elements included too - die, alphabets and red.

The patterned paper I used is a large rose from a 12x12 sheet from Altenew's Reflections collection - sorry no longer available!  I die cut it with Hero Arts birthday greetings and then popped up the die cut letters with white fun foam. Added the little "time to celebrate" and done.

Hope to see a card from you in my challenge this week - the winner will be a future guest designer!   Crafty Hugs!