>

Thursday, March 28, 2024

SPRING WREATH

Time for another TicTacToe Challenge#244 with a board designed by Linda.  I went down the left side of the board with wreath, spring colors and twine.


I die cut three layers of leaves and layered together for my wreath.  Used some small flowers in peach and white along with some peach enamel dots to decorate my wreath.  Ink blended a background with speckled egg DO and overlapped it onto the base card.  Added the sentiment and a few more a few more enamel dots and done.  I think I spent more time finding a sentiment to fit the space than I did making the rest of the card!!

Hope you'll join our challenge this week - winner will be a future guest designer.


Thursday, February 29, 2024

BLUE PEONY

I designed the board for this week's TicTacToe Challenge #242.  I went across the top of board with CAS, Thinking of You and Floral.


Discussion on IG and FB sites have been encouraging us to pull out our neglected older stamps and dies - so I did just that!   Used an old favorite of mine for the floral - discontinued from Altenew.  The thin frame dies are from HoneyBee and also discontinued.  I stamped the flower and leaves in black ink, embossed with clear powder on Bristol paper and watercolored the peony.  Trimmed this piece and added the thin frame to it and also around the edge of the card.   The  sentiment strip finished it off along with a few black enamel dots.
 
I hope you'll find some inspiration from my board and join us in
creating a card for our challenge - winner will be a future guest designer.


Monday, February 26, 2024

LOVELY FLORALS

I haven't entered Altenew's Inspiration Challenge in ages.  The other day tho I felt like watercoloring and pulled out my Altenew Watercoloring Pad.

I began with my regular Altenew watercolors in coral berry for the large flowers and purple wine for the little ones.  Then pulled out my Altenew watercolor brush markers and used citrus burst to add more of a peach color to the two large flowers.  The centers of the flowers are lime and the haze around all is cloudy sky. Finally spattered the whole piece with some watered down acrylic paint.  Cut the whole piece with a double stitched die and mounted on an A2 card base.  Added the little sentiment and a few white enamel dots and done!


 Thanks for stopping by today.  Crafty hugs.


Wednesday, February 21, 2024

HAPPY BIRTHDAY TIME OUT CHALLENGE!


Time Out Challenge is having a birthday party - so here is a card to wish them a happy birthday!

I die cut a bunch of flowers and leaves from various blues and greens and then arranged them on the middle panel of a pop-up card - it's from a Jennifer McGuire video.  Doing the flower arranging took the most fiddling around!  The sides are extra pieces that I embossed with a leafy design folder.   Added a little birthday greeting and done!

Happy Birthday Time Out!


Tuesday, February 13, 2024

HAPPY EASTER

I made a very simple Easter card with kind of a different size fold for my card class next week.


The base for my card is cut at 4.25"x6" and scored and folded at 3".  This way with the bunny sitting on top of the fold, the card will still fit into an A2 envelope.  I die cut all the eggs, the chick and the grass and adhered to the bottom of the card.  Colored the chick's wings with a copic marker for a little added color.  All the eggs were die cut from patterned paper scraps.  Gave bunny a little color in his ears and cheeks and a small black enamel dot for his eye.  Added the "Happy Easter" sentiment and done.  I think this card would be cute with any character or a row of smaller ones across the top - just adjust the size of the card base accordingly to fit in an envelope.  Also would make fun place cards in a smaller size.  

Thanks for stopping by today.


Thursday, February 1, 2024

BOXWOOD HEART

My first post for the TicTacToe Challenge of 2024!  Please note that our challenge now runs for two weeks so this one will end on 15 February - gives everyone a bit more time to create.  Vicky designed our board for this week and I chose across the top with enamel dots, kraft and the work "love".


I love the boxwood heart from The Greetery.  On a pink base I added the leaves which I die cut from smooshed green paper I made.  Used an impression plate  to give some texture to the kraft background and then spattered with white acrylic paint.  I made the heart into a shaker with little pink hearts inside.  Put it all together with enamel dots, a twine bow and the little love sentiment.  Perfect for Valentine's Day or any other day for that matter!!


Hope you'll join our challenge this time around.  Crafty hugs,


Monday, January 15, 2024

BLUE FLORALS

A quick post for my card entry in the "Stay Crafty With Hero" challenge for January - "old is new".  I still had a floral piece left on my desk this morning so colored it quickly with some distress oxides and stencils.  Used the confetti background and a birthday sentiment from Hero Arts (no longer available). and HA black enamel dots


Thanks for stopping by today.


Sunday, January 14, 2024

FRAGRANT FLORALS

I can't remember when I last entered a challenge - seems 2023 went by with none!  So many other things to do in retired life:-)  So here we go with an entry to the Time Out Challenge.  The theme is "NEW" and the floral I used for my card is from a "new to me" craft your life kit from Altenew.


I love getting a twofer from a stamp or die!  After using the stencils to color my floral piece, I cut it in half.  On one card I used a circle impression plate on the front of the card along with a simple birthday greeting.  On the other, I ink blended more pink to accent the flowers.  On both, a few sequins finished them off!!  Can you tell my birthday card stash is really low?

Thanks for stopping by!


Sunday, January 7, 2024

VALENTINE

It's been a month since I've posted anything here - probably because I was making scads of Christmas cards to sell at a craft bazaar - and then trying to send out all my own cards!  So here we go with the first card of 2024 - I'm leading a card class in a few weeks and thought a Valentine shaker would be a fun card for the participants to make.


This is one of those easy shakers to make.  Found the cute stripe cellophane bags on Amazon to use for the shaker.  Filled with some tiny pink hearts, gold sequins and a few gold tiny beads.  Die cut the pink and gold hearts for the front and added the small gold embossed sentiment and done.  I usually prep a lot of the card for the participants and then they put it all together.

Happy New Year to my readers!  Crafty hugs,


Thursday, December 7, 2023

CHRISTMAS ORNAMENT

It's time for December TicTacToe Challenge #238 designed by Felicita.  I have been stitching a few ornament cards for special people on my card list and this one worked perfectly for this week's challenge.


I find stitching these ornaments so much fun - and so easy to do while watching a favorite TV show.  I finished off the back also.


I used gold metallic thread as a hanger for the ornament and it is just scotch taped to the back of the embossed panel.  That way the card panel is removable and the ornament can be put on the tree.  Just a simple little sentiment finished off the card.


I went from left to right diagonally - free, ornament and red or green.  I think have just about all the board elements in my card except patterned paper.

Hope to see you in our challenge this week - crafty hugs,


Sunday, December 3, 2023

PINK POINSETTIA

 Another Christmas card for the stash!

supplies: sentiment: flower; arches; mica spray
I first took a sheet of pink cs and sprayed with TH mica spray.  Then spattered with gold metallic watercolor.  Did the same for the green.  Die cut petals and leaves and assembled the flower.  Used arch dies to make the card base.  Put it all together with white berries and a little sentiment.

Thanks for stopping by.


Saturday, December 2, 2023

CHRISTMAS VILLAGE

The other night Gina K. did a video on making a little village scene Christmas card.  I didn't have any of the dies she used, but was still able to make a similar card with other dies.


I shopped my stash and used a little village die, some trees, snow banks, a sentiment and a frame - all from different companies.  After the village was glued to the vellum, I colored in all the windows (on the back of the vellum) with yellow copic marker.  It took a little fiddling around but I think it came together pretty well.  

Thanks for dropping by.


Thursday, November 23, 2023

HAPPY THANKSGIVING

Happy Thanksgiving and what a great day to be designing a thank you card for TicTacToe Challenge #236 - board created by Elizabeth.  I went down the center with die cut, free and thankful.

supplies: embossing folder; cardstock 

I made a mini slimline card (3.25"x6.25").  Embossed the center panel with some fall leaves and then added various die cut leaves.  I had fun with making some pretty papers with TH mica sprays and used that for my leaves.  Before assembling my card, I spattered metallic gold and finally added some Nuvo copper drops.


Thanks for stopping by - Happy Thanksgiving - crafty hugs,


Monday, November 20, 2023

FROM THE SCRAPBOX

I went thru my scrapbox yesterday and made this card from a piece I had stamped years ago - I don't think I even have the stamps any longer.  Too bad as I rather like the end result!

It was A2 size so cut it down and added a gold border.  Added the gold embossed sentiment, some gold sparkle bits, put it on a Desert Storm card base and done!!


Thursday, November 9, 2023

BLUE POINSETTIA

We're counting down to Christmas with Joanne's challenge #234 this week.  I went down the right side with cream, sentiment and navy - what a fun color combo for Christmas!!

supplies: poinsettia; embossing folder; sentiment; patterned paper

My embossed background really is cream although it looks quite white in the photo - you'll just have to believe me!  After embossing the panel, I added it to the navy base.  Then added the blue poinsettia which I die cut from some patterned papers.  Lastly, the little sentiment was adhered and the whole card spattered with gold ink.

Hope you'll join us this week at TicTacToe #234 - you'll have a chance to become a future guest designer.


Thursday, October 26, 2023

GINGKO LEAVES

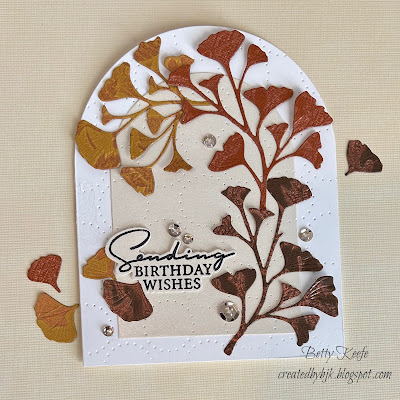
I'm the board designer for this week at TicTacToe Challenge #232.  The idea I had in mind was to include fall and thanksgiving.  For my design, I went with the bottom row across - shape die, rust and leaves.  Hadn't done anything with my gingko leaves die for a long time - so that was my beginning.


Had some embossed and colored with pigment ink pieces of cardstock on my desk - had been playing with the technique from Jennifer which she showed a few weeks ago.  I had chosen copper metallic pigment ink and some darker pieces of cardstock.  Wasn't over the moon with the color combo or the dark colors.  So they became the leaves for my card. You can see the copper on the leaves a bit.   Used the arch dies for my card shape with a cream color metallic cs which I embossed with a circle impression plate.  Added the little birthday greeting and sequins and done!
 
Here's a closeup of the leaves embossed with copper.


Thanks for stopping by - join our challenge this week - the winner will be a future guest designer!  Crafty Hugs! 


Tuesday, October 24, 2023

CHRISTMAS POP-UP CARDS

I have had some Graphic45 papers for ages and among them are these large Christmas pictures.  Finally had an idea on how to use them.  These particular papers are no longer available but they have others in their current collections.


I made pop-up frame cards using Jennifer's instructions for the pop-up part.  I made my card an A2 portrait size card.  After folding the back of the card (the pop-up part), I glued in the Christmas scene.  Then I glued my french door front onto the back section.  

I made a little wreath for the door by die cutting a circle base using two dies together.  Die cut a bunch of green sprigs and glued them around the circle and added a few red "berries".  Added an appropriate sentiment and done.  Below is a closeup of the wreath.

The base of the card is white 110lb cardstock as is the front piece and stands up nicely.  A personal message can be written on the back of the card.

Thanks for visiting today.


Thursday, October 12, 2023

AUTUMN WREATH

Vicky created the board for this week's TicTacToe Challenge #230.  I went across the top with leaves, thank you and plaid.  

 supplies: wreath; plaid background: enamel dots

I embossed the front of the card with a plaid die.  Die cut my wreath from copper embossed cardstock which was in three different colors.  Added the thanks sentiment and the enamel dots and done.


Since I layered all my leaf die cuts to make my wreath, I'm entering my card at Die Cut Divas challenge for this month.

Lots of variety from which to choose this week, so hope you join in the fun for a chance to be a future guest designer.  Crafty hugs,